> For the complete documentation index, see [llms.txt](https://docs.glbnxt.com/llms.txt). Markdown versions of documentation pages are available by appending `.md` to page URLs; this page is available as [Markdown](https://docs.glbnxt.com/tutorials/guides/use-case-instructions/vectorbase-storage-minio.md).
# VectorIQ - Automated Vector Storage
### Introduction
This guides walks you through an automated vector storage flow. The use case provides an automated blueprint that synchronizes documents from S3-compatible storage (like MinIO) with a PostgreSQL vector database while serving as a real-time retrieval gateway. The pipeline automatically parses, chunks, and injects newly added storage files into isolated database tables based on their parent directory.
*Note that this is a Use Case Instruction, you can use this Use Case as an example to build your own custom Transcriber Workflow in n8n.*
***
### Prerequisites
* Check out [Connecting n8n Workflows to OpenWebUI via Function](/tutorials/guides/use-case-instructions/connecting-n8n-workflows-to-openwebui-via-function.md) to connect OpenWebUI to n8n. You need to have set this up before starting this tutorial.
***
### Steps
#### Step 1: Open the Workflow
1. On the [Use Cases Page](https://platform.glbnxt.com/sandbox) find the column **VectorIQ - Automated Vector Storage**. Now, press the `Download` icon.
2. Open n8n in you [Dashboard](https://platform.glbnxt.com/) and create a workflow. Click on the three dots in the right corner of your screen and then on `Import from URL...`.
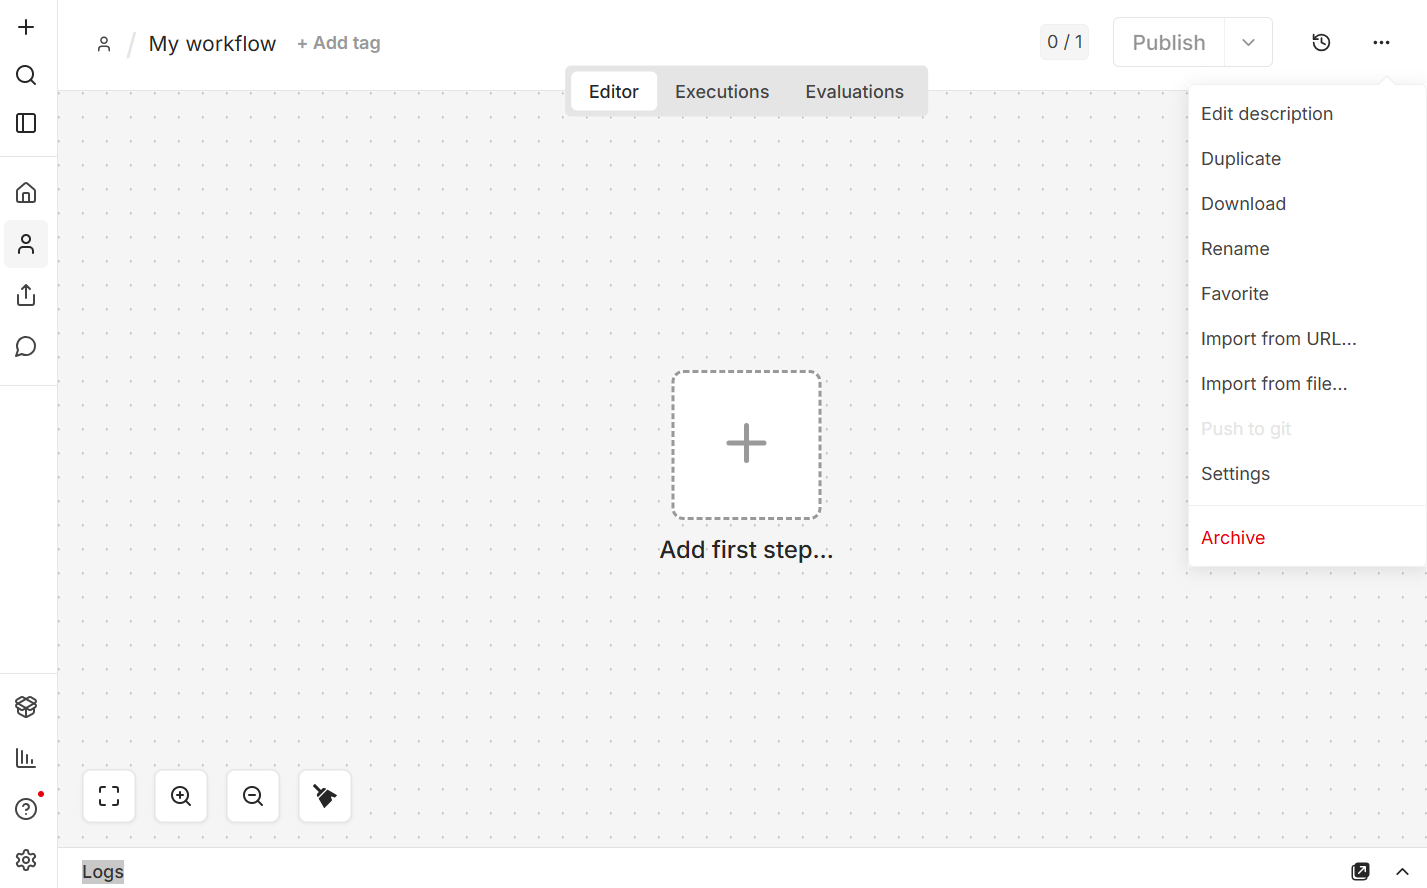 3. Enter the URL in the pop-up that appears.
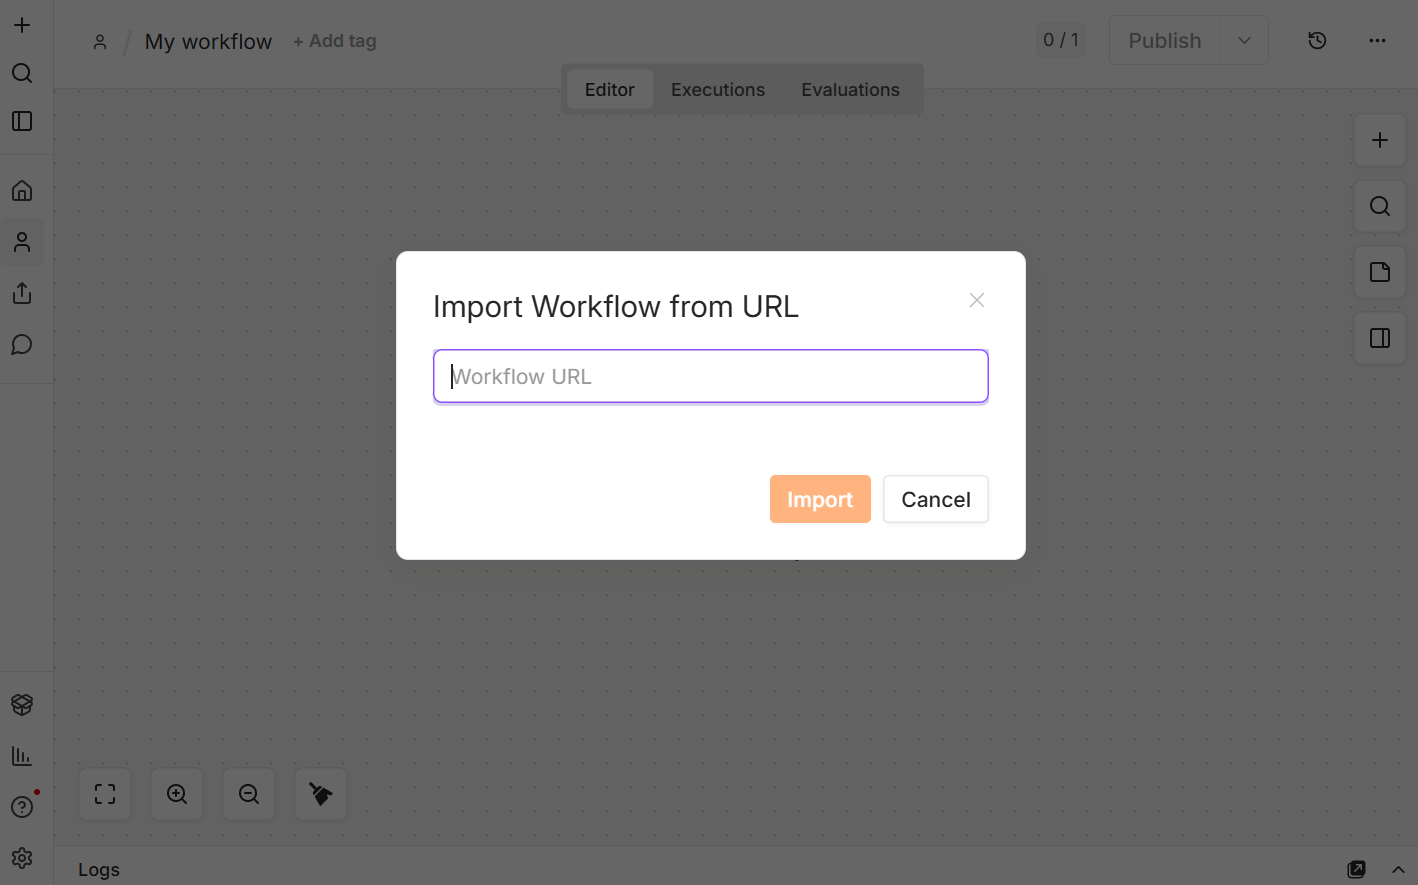 4. Click on `Import` and the Demo Workflow will appear on your page.
5. Follow the **Setup** in the Workflow.
***
#### Step 2: Create a Table
1. In the n8n application look for the column "Postgres Database Maintenance".
2. Double-click the node "Create Table" and create the table. This table ensures that you log all files that are uploaded to the Vector Database also in a 'normal' database.
***
#### Step 3: Initialize Target Categorization Directories
To leverage dynamic directory and semantic category routing, navigate to your external S3-compatible object storage provider (e.g., MinIO).
1. Open your target storage browser dashboard and select or create the primary bucket named `knowledge`.
2. Inside the bucket, initialize individual subfolders representing your operational datasets using exact lowercase characters (for example: `marketing`, `human-resources`, and `documentation`).
3. Upload several target processing documents (PDFs, Markdown text, or structural documents) into these subfolders to verify structural folder paths before activating the synchronization pipeline.
***
#### Step 4: Configure Storage Engine Scanning & State Matching
Locate the section labeled **Storage Scanning** on your n8n workflow canvas.
1. Double-click the **MinIO - Get Folders** node. Map your corresponding storage engine credentials and confirm that the target property points directly to your `knowledge` bucket.
2. Under the **Database Synchronization Audit** group, inspect the **PostgreSQL** and **Create VDB** nodes.
3. The **Create VDB** node will dynamically establish structural `pgvector` store tables for each newly discovered category directory utilizing the following pattern:
SQL
```
CREATE TABLE IF NOT EXISTS {{ $json.foldername.toLowerCase() }}_vector_store (
id UUID PRIMARY KEY DEFAULT gen_random_uuid(),
content TEXT,
text TEXT,
embedding VECTOR(1536),
metadata JSONB
);
```
***
#### Step 5: Validate Mutation Handlers & Document Processing
Move over to the center handling modules responsible for computing file deltas.
1. The **Find New Files** node evaluates data entries across your MinIO directories versus existing database rows in `vector_sync_logs`. Any unregistered document passes directly to **Download New Files** and into the parsing block engine (**Docling**).
2. Open the **Chunk and ID New Files** script node to review how data structures are split. This script segments extracted Markdown layout text into granular 400-character windows using a 60-character boundary overlap to guarantee semantic continuity:
JavaScript
```
const chunkSize = 400;
const overlap = 60;
// Generates unique IDs patterned as: chunk_lowercasefilename_index
```
3. Simultaneously, any file found deleted or missing from the storage bucket passes into **Find Deleted Files**, which triggers a cascade purge query through **Delete Files from DB and VDB** to cleanly remove lingering chunks from your active vector store tables.
***
#### Step 6: Deploy Embeddings Generation & Vector Store Injection
Within the final stage of the ingestion block, verify your vector configuration settings.
1. Double-click the embedding model node named **text-embedding-3-small**.
2. Confirm your target dimension properties are locked at exactly `1536` dimensions to align perfectly with your PostgreSQL Vector store properties.
3. The **Postgres VDB** node automatically injects computed floating-point multidimensional arrays directly into your active runtime vector tables based on the dynamically resolved folder category variable: `="{{ $json.foldername }}_vector_store"`.
***
#### Step 7: Connect the Real-Time AI Agent Retrieval Gateway
Navigate downward on the layout grid to inspect the client-side retrieval interface layer (**Live Chat & Semantic Knowledge Retrieval Gateway**).
1. The **Input OpenWebUI** Webhook node acts as the entry endpoint listener handling frontend user inputs.
2. Double-click the core **AI Agent** node. The model functions as a strict semantic categorizer using explicit system directives. Review the hardcoded taxonomy restrictions:
> *When a user asks a question, you MUST identify which exact category it pertains to. You are only allowed to choose from these exact strings: 'marketing', 'human-resources', or 'documentation'. Pass this as the 'category' parameter.*
3. When a user submits an query (e.g., *"What is our brand positioning plan?"*), the routing LLM invokes the internal **Call 'Knowledge Base Mapped'** subflow tool, automatically classifying the parameter category as `marketing`.
4. This initiates **Execute Subflow** and routes a semantic text lookup through an isolated SQL distance computation script inside the **Execute a SQL query** node:
SQL
```
SELECT text, metadata,
(embedding <=> '{{ JSON.stringify($json.data[0].embedding) }}') as distance
FROM "{{ $('Execute Subflow').item.json.category.toLowerCase() }}_vector_store"
ORDER BY distance ASC
LIMIT 5;
```
5. The matching historical fragments are collected and returned instantly to compile a structured contextual chat response inside your connected UI interface.
***
*Need help? Contact the GLBNXT support team or ask a GLBNXT agent to walk you through the setup.*
---
# Agent Instructions
This documentation is published with GitBook. GitBook is the documentation platform designed so that both humans and AI agents can read, navigate, and reason over technical content effectively. Learn more at gitbook.com.
## Querying This Documentation
If you need additional information that is not directly available in this page, you can query the documentation dynamically by asking a question.
Perform an HTTP GET request on the current page URL with the `ask` query parameter, and the optional `goal` query parameter:
```
GET https://docs.glbnxt.com/tutorials/guides/use-case-instructions/vectorbase-storage-minio.md?ask=&goal=
```
`ask` is the immediate question: it should be specific, self-contained, and written in natural language.
`goal` is optional and describes the broader end goal you are ultimately trying to accomplish on behalf of the user. GitBook uses it to tailor the answer towards what is most useful for that goal.
The response will contain a direct answer to the question and relevant excerpts and sources from the documentation.
Use this mechanism when the answer is not explicitly present in the current page, you need clarification or additional context, or you want to retrieve related documentation sections.
4. Click on `Import` and the Demo Workflow will appear on your page.
5. Follow the **Setup** in the Workflow.
***
#### Step 2: Create a Table
1. In the n8n application look for the column "Postgres Database Maintenance".
2. Double-click the node "Create Table" and create the table. This table ensures that you log all files that are uploaded to the Vector Database also in a 'normal' database.
***
#### Step 3: Initialize Target Categorization Directories
To leverage dynamic directory and semantic category routing, navigate to your external S3-compatible object storage provider (e.g., MinIO).
1. Open your target storage browser dashboard and select or create the primary bucket named `knowledge`.
2. Inside the bucket, initialize individual subfolders representing your operational datasets using exact lowercase characters (for example: `marketing`, `human-resources`, and `documentation`).
3. Upload several target processing documents (PDFs, Markdown text, or structural documents) into these subfolders to verify structural folder paths before activating the synchronization pipeline.
***
#### Step 4: Configure Storage Engine Scanning & State Matching
Locate the section labeled **Storage Scanning** on your n8n workflow canvas.
1. Double-click the **MinIO - Get Folders** node. Map your corresponding storage engine credentials and confirm that the target property points directly to your `knowledge` bucket.
2. Under the **Database Synchronization Audit** group, inspect the **PostgreSQL** and **Create VDB** nodes.
3. The **Create VDB** node will dynamically establish structural `pgvector` store tables for each newly discovered category directory utilizing the following pattern:
SQL
```
CREATE TABLE IF NOT EXISTS {{ $json.foldername.toLowerCase() }}_vector_store (
id UUID PRIMARY KEY DEFAULT gen_random_uuid(),
content TEXT,
text TEXT,
embedding VECTOR(1536),
metadata JSONB
);
```
***
#### Step 5: Validate Mutation Handlers & Document Processing
Move over to the center handling modules responsible for computing file deltas.
1. The **Find New Files** node evaluates data entries across your MinIO directories versus existing database rows in `vector_sync_logs`. Any unregistered document passes directly to **Download New Files** and into the parsing block engine (**Docling**).
2. Open the **Chunk and ID New Files** script node to review how data structures are split. This script segments extracted Markdown layout text into granular 400-character windows using a 60-character boundary overlap to guarantee semantic continuity:
JavaScript
```
const chunkSize = 400;
const overlap = 60;
// Generates unique IDs patterned as: chunk_lowercasefilename_index
```
3. Simultaneously, any file found deleted or missing from the storage bucket passes into **Find Deleted Files**, which triggers a cascade purge query through **Delete Files from DB and VDB** to cleanly remove lingering chunks from your active vector store tables.
***
#### Step 6: Deploy Embeddings Generation & Vector Store Injection
Within the final stage of the ingestion block, verify your vector configuration settings.
1. Double-click the embedding model node named **text-embedding-3-small**.
2. Confirm your target dimension properties are locked at exactly `1536` dimensions to align perfectly with your PostgreSQL Vector store properties.
3. The **Postgres VDB** node automatically injects computed floating-point multidimensional arrays directly into your active runtime vector tables based on the dynamically resolved folder category variable: `="{{ $json.foldername }}_vector_store"`.
***
#### Step 7: Connect the Real-Time AI Agent Retrieval Gateway
Navigate downward on the layout grid to inspect the client-side retrieval interface layer (**Live Chat & Semantic Knowledge Retrieval Gateway**).
1. The **Input OpenWebUI** Webhook node acts as the entry endpoint listener handling frontend user inputs.
2. Double-click the core **AI Agent** node. The model functions as a strict semantic categorizer using explicit system directives. Review the hardcoded taxonomy restrictions:
> *When a user asks a question, you MUST identify which exact category it pertains to. You are only allowed to choose from these exact strings: 'marketing', 'human-resources', or 'documentation'. Pass this as the 'category' parameter.*
3. When a user submits an query (e.g., *"What is our brand positioning plan?"*), the routing LLM invokes the internal **Call 'Knowledge Base Mapped'** subflow tool, automatically classifying the parameter category as `marketing`.
4. This initiates **Execute Subflow** and routes a semantic text lookup through an isolated SQL distance computation script inside the **Execute a SQL query** node:
SQL
```
SELECT text, metadata,
(embedding <=> '{{ JSON.stringify($json.data[0].embedding) }}') as distance
FROM "{{ $('Execute Subflow').item.json.category.toLowerCase() }}_vector_store"
ORDER BY distance ASC
LIMIT 5;
```
5. The matching historical fragments are collected and returned instantly to compile a structured contextual chat response inside your connected UI interface.
***
*Need help? Contact the GLBNXT support team or ask a GLBNXT agent to walk you through the setup.*
---
# Agent Instructions
This documentation is published with GitBook. GitBook is the documentation platform designed so that both humans and AI agents can read, navigate, and reason over technical content effectively. Learn more at gitbook.com.
## Querying This Documentation
If you need additional information that is not directly available in this page, you can query the documentation dynamically by asking a question.
Perform an HTTP GET request on the current page URL with the `ask` query parameter, and the optional `goal` query parameter:
```
GET https://docs.glbnxt.com/tutorials/guides/use-case-instructions/vectorbase-storage-minio.md?ask=&goal=
```
`ask` is the immediate question: it should be specific, self-contained, and written in natural language.
`goal` is optional and describes the broader end goal you are ultimately trying to accomplish on behalf of the user. GitBook uses it to tailor the answer towards what is most useful for that goal.
The response will contain a direct answer to the question and relevant excerpts and sources from the documentation.
Use this mechanism when the answer is not explicitly present in the current page, you need clarification or additional context, or you want to retrieve related documentation sections.