> For the complete documentation index, see [llms.txt](https://docs.glbnxt.com/llms.txt). Markdown versions of documentation pages are available by appending `.md` to page URLs; this page is available as [Markdown](https://docs.glbnxt.com/tutorials/guides/openwebui/images-in-openwebui.md).
# Images in OpenWebUI
### Introduction
Open WebUI lets you generate and edit images right from the chat interface, whether you want to create visual content, generate art, quickly prototype an image, or edit existing pictures without leaving your conversation. By connecting an image generation engine (such as Nano Banana, or GPT Image) through the admin settings, you can enable an image option in the chat and simply describe what you want to generate or change.
> ❗ **Note:** the model selected as the chat model MUST be a language model, never the image generation model itself. The image model is configured separately in the admin Images settings and should never be chosen as the active chat model. We will elaborate on the matter in this guide.
***
### Prerequisites
Before configuring images in OpenWebUI, ensure you have the following:
* **OpenWebUI Environment:** Admin access to OpenWebUI running within your secure GLBNXT workspace.
* **GLBNXT API Key:** Create a [GLBNXT API Key](https://platform.glbnxt.com/api-keys) to track your embeddings.
***
### Configuration
#### Step 1: Create an API Key
1. Go to [GLBNXT API Keys](https://platform.glbnxt.com/api-keys) and click on `+ Create Key`.
2. Enter a name, risk level, expiration and select models (make sure to at least include the embedding models).
3. Copy the API Key and store it somewhere safe.
#### Step 2: Configure 'images' in OpenWebUI
1. Open OpenWebUI, make sure that you log in as an admin.
2. Select the Admin Account, go to Admin Panel > Settings > Images.
3. Lower on the page you will find "Images", toggle Image Generation on.
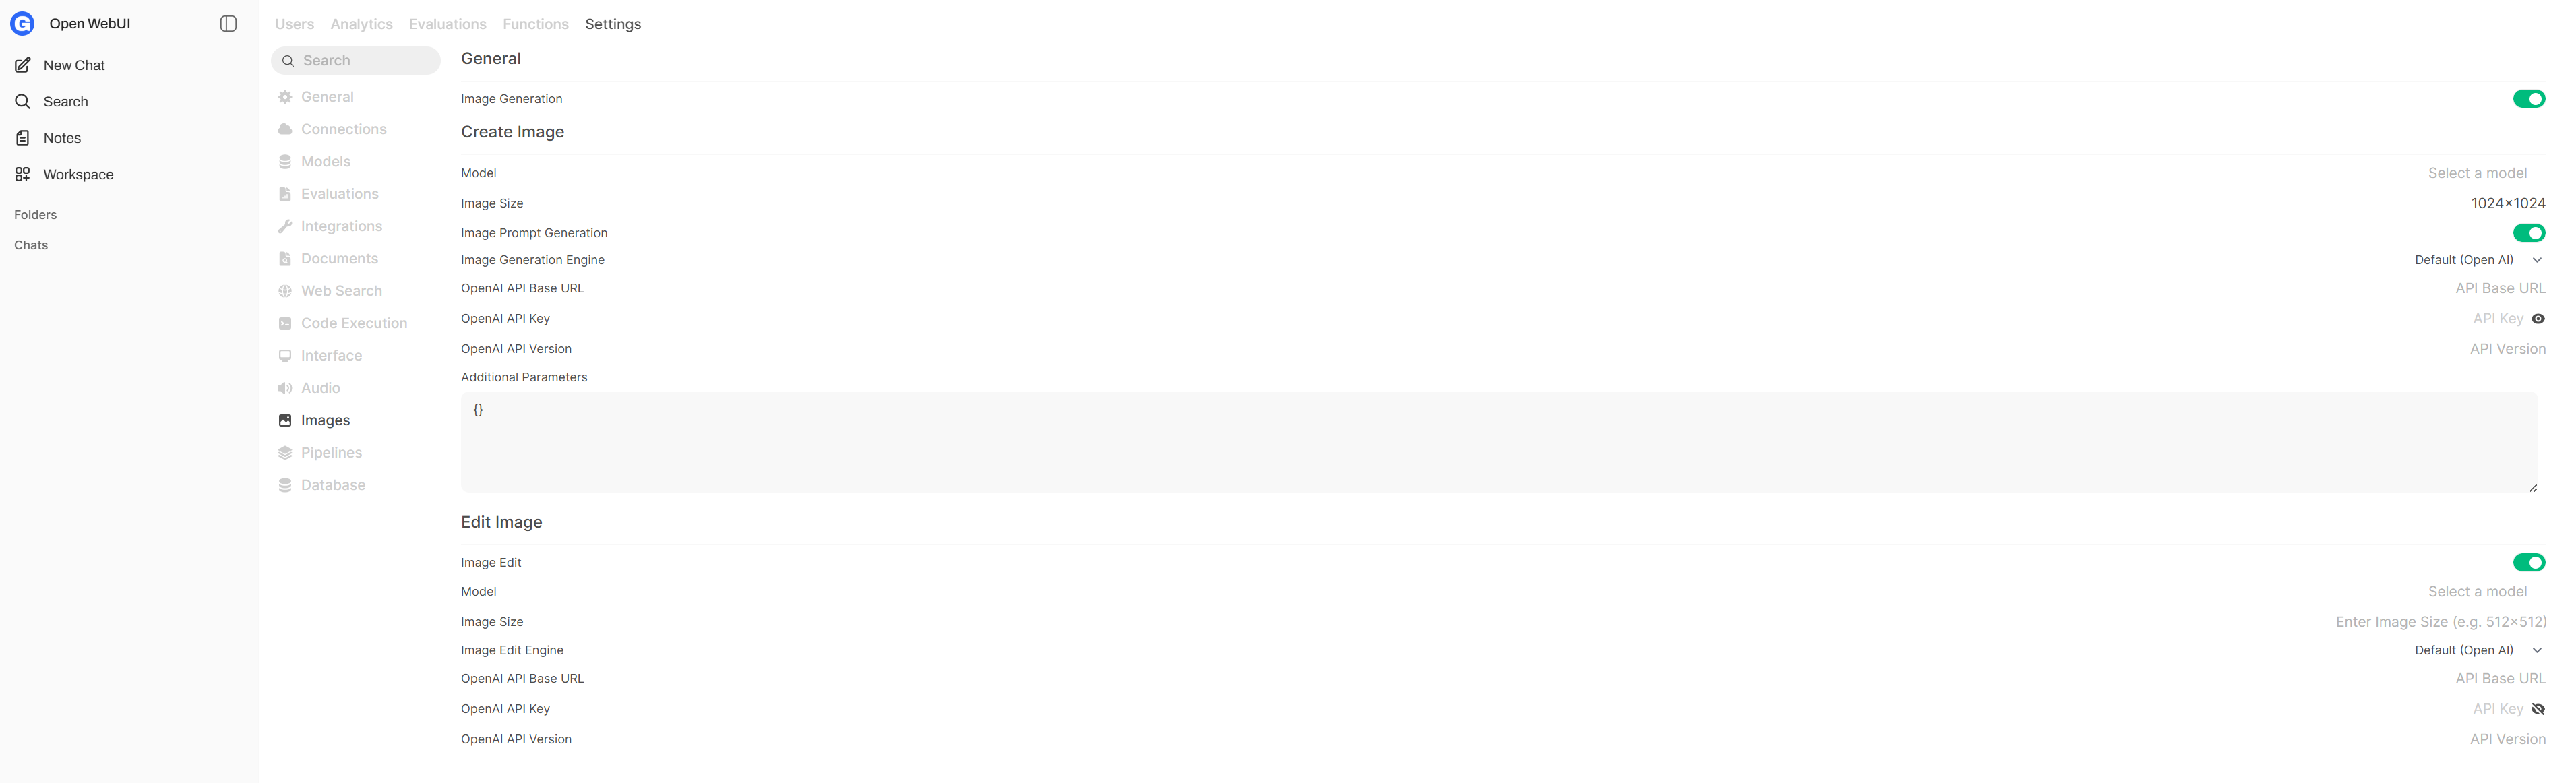 4. The above page will appear, the Image Generation Engine should stay on `Default (Open AI)`.
5. Use the **OpenAI API Base URL:** OpenAI-compatible endpoint found in [GLBNXT API Keys](https://platform.glbnxt.com/api-keys).
6. Enter the API Key from Step 1 in the API Key field in OpenWebUI.
7. Then paste the model ID of your preferred image generating / editing model. In the example below, we have chosen for `nano-banana`, but you could also choose `gpt-image-2`, `nano-banana-2`, etc.
4. The above page will appear, the Image Generation Engine should stay on `Default (Open AI)`.
5. Use the **OpenAI API Base URL:** OpenAI-compatible endpoint found in [GLBNXT API Keys](https://platform.glbnxt.com/api-keys).
6. Enter the API Key from Step 1 in the API Key field in OpenWebUI.
7. Then paste the model ID of your preferred image generating / editing model. In the example below, we have chosen for `nano-banana`, but you could also choose `gpt-image-2`, `nano-banana-2`, etc.
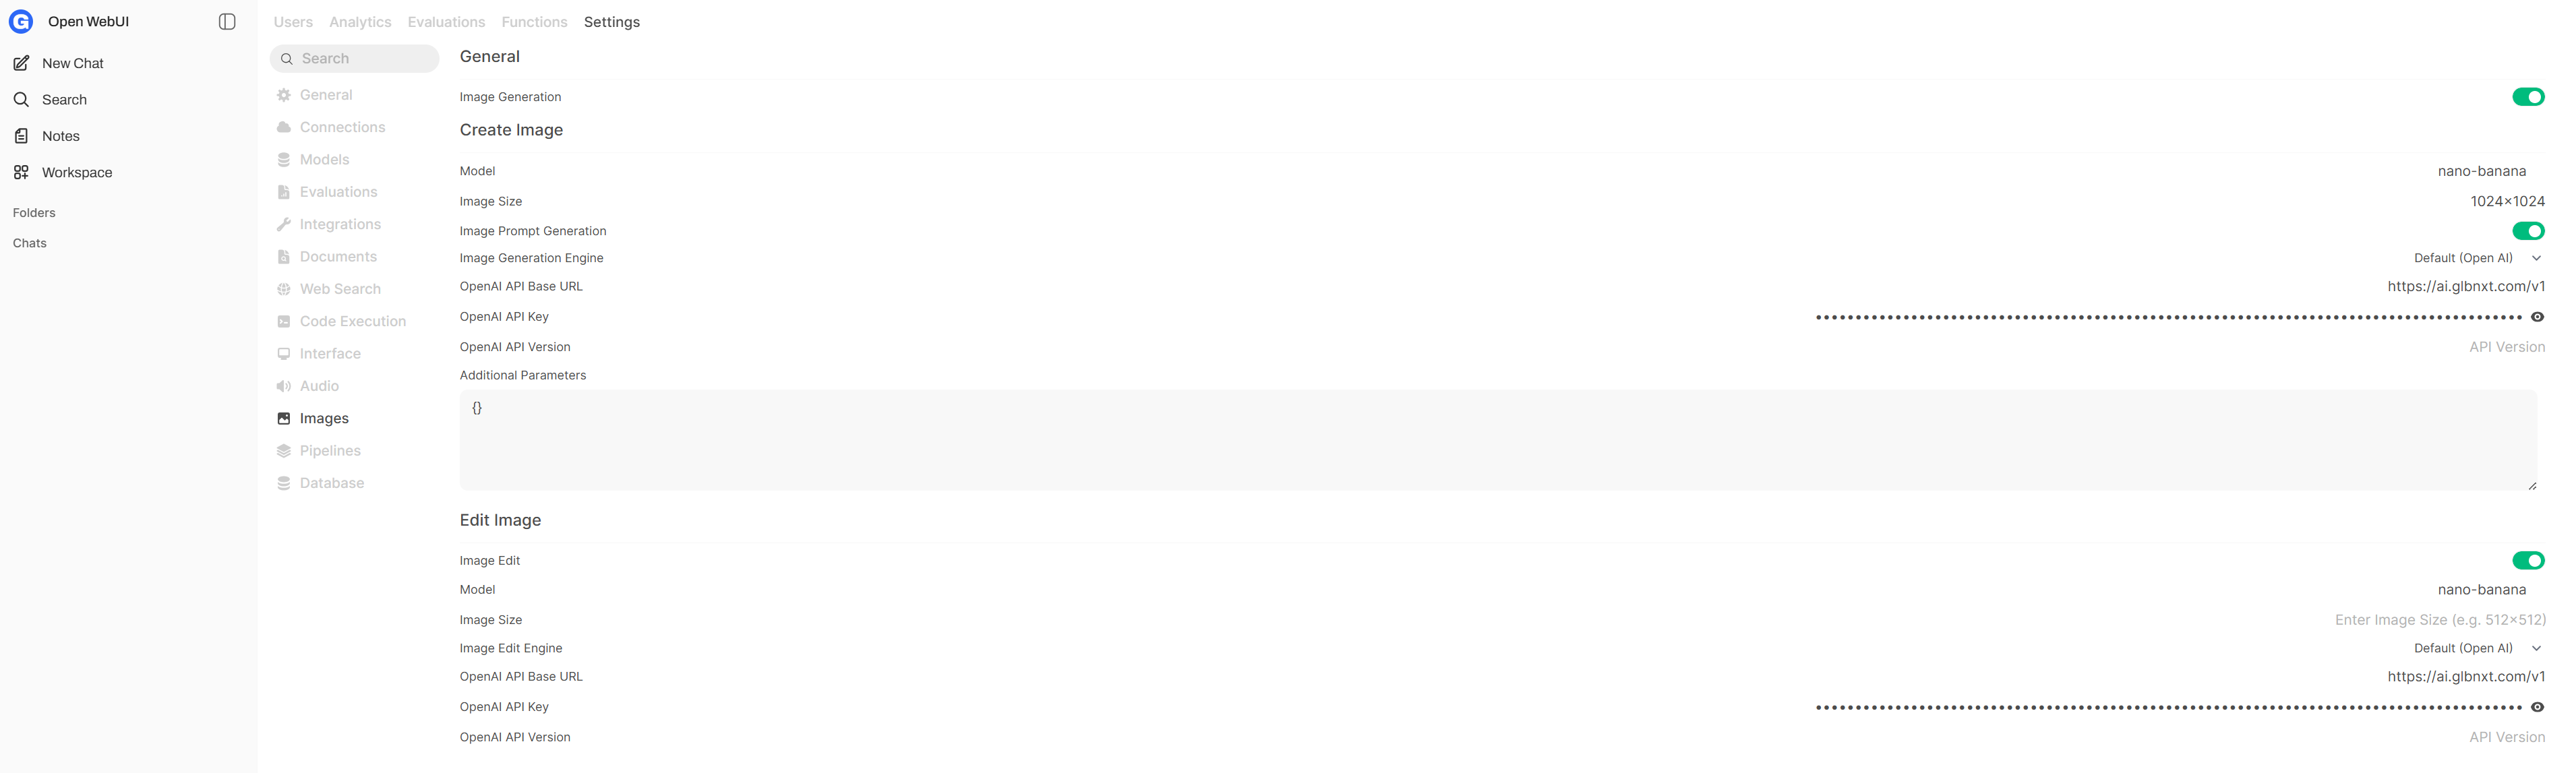 8. Press `Save`, your OpenWebUI instance is now ready to generate and edit images.
***
### Important Note!
As noted in the introduction, it is important to remember the following about generating images in OpenWebUI:
* Go through this guide and make sure that an *image generating model* is selected in the Admin Settings under Images.
* After finalizing the configuration, go to your OpenWebUI Chat Interface.
> ❗ Make sure to select a *language model* (and not an *image generating model*).
* Only when a language model is selected you will be able to actually generate and edit images.
* Click on "integrations" (the button with the four small diamonds) and toggle "Image" on.
8. Press `Save`, your OpenWebUI instance is now ready to generate and edit images.
***
### Important Note!
As noted in the introduction, it is important to remember the following about generating images in OpenWebUI:
* Go through this guide and make sure that an *image generating model* is selected in the Admin Settings under Images.
* After finalizing the configuration, go to your OpenWebUI Chat Interface.
> ❗ Make sure to select a *language model* (and not an *image generating model*).
* Only when a language model is selected you will be able to actually generate and edit images.
* Click on "integrations" (the button with the four small diamonds) and toggle "Image" on.
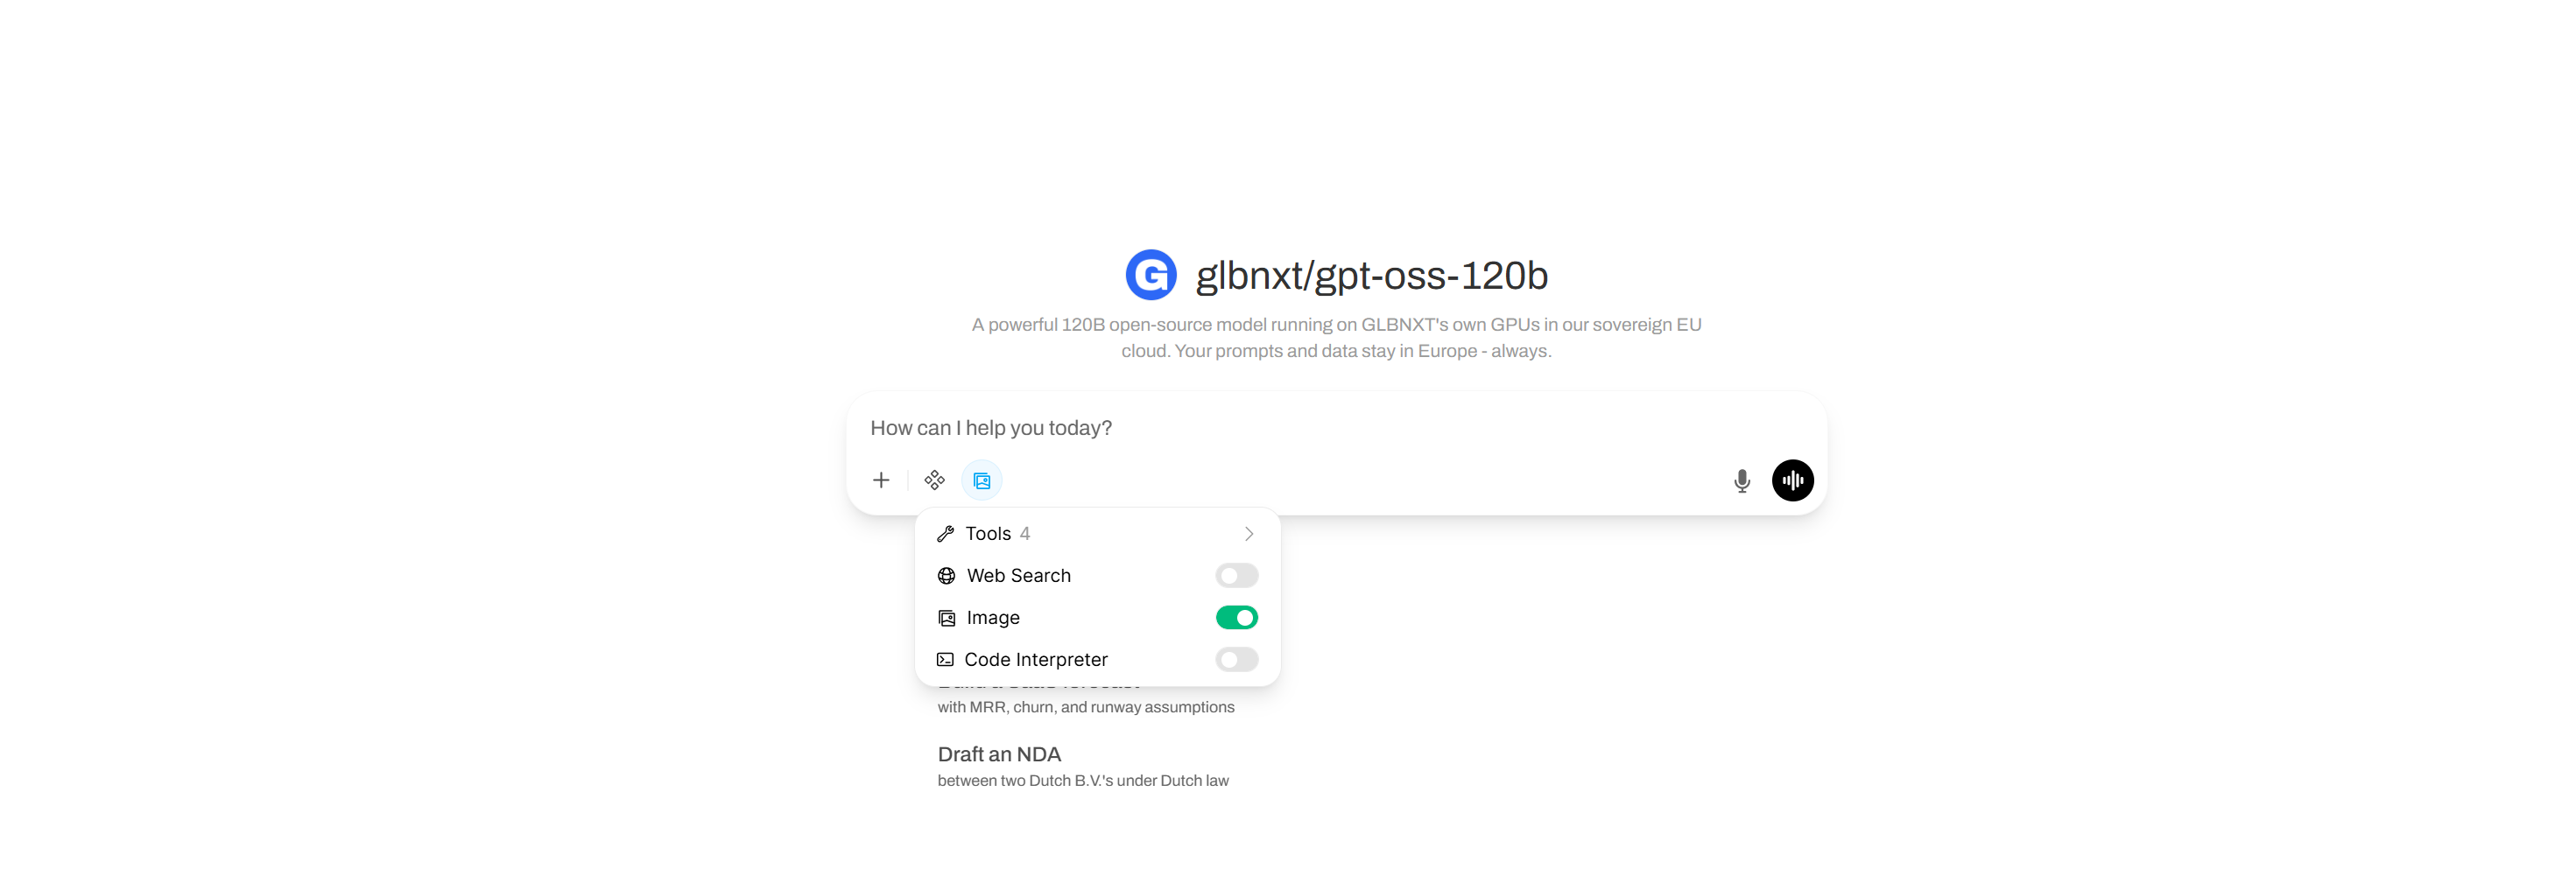 * Now you are fully enabled to generate and edit images in OpenWebUI.
***
*Need help? Contact the GLBNXT support team or ask a GLBNXT agent to walk you through the setup.*
---
# Agent Instructions
This documentation is published with GitBook. GitBook is the documentation platform designed so that both humans and AI agents can read, navigate, and reason over technical content effectively. Learn more at gitbook.com.
## Querying This Documentation
If you need additional information that is not directly available in this page, you can query the documentation dynamically by asking a question.
Perform an HTTP GET request on the current page URL with the `ask` query parameter, and the optional `goal` query parameter:
```
GET https://docs.glbnxt.com/tutorials/guides/openwebui/images-in-openwebui.md?ask=&goal=
```
`ask` is the immediate question: it should be specific, self-contained, and written in natural language.
`goal` is optional and describes the broader end goal you are ultimately trying to accomplish on behalf of the user. GitBook uses it to tailor the answer towards what is most useful for that goal.
The response will contain a direct answer to the question and relevant excerpts and sources from the documentation.
Use this mechanism when the answer is not explicitly present in the current page, you need clarification or additional context, or you want to retrieve related documentation sections.
* Now you are fully enabled to generate and edit images in OpenWebUI.
***
*Need help? Contact the GLBNXT support team or ask a GLBNXT agent to walk you through the setup.*
---
# Agent Instructions
This documentation is published with GitBook. GitBook is the documentation platform designed so that both humans and AI agents can read, navigate, and reason over technical content effectively. Learn more at gitbook.com.
## Querying This Documentation
If you need additional information that is not directly available in this page, you can query the documentation dynamically by asking a question.
Perform an HTTP GET request on the current page URL with the `ask` query parameter, and the optional `goal` query parameter:
```
GET https://docs.glbnxt.com/tutorials/guides/openwebui/images-in-openwebui.md?ask=&goal=
```
`ask` is the immediate question: it should be specific, self-contained, and written in natural language.
`goal` is optional and describes the broader end goal you are ultimately trying to accomplish on behalf of the user. GitBook uses it to tailor the answer towards what is most useful for that goal.
The response will contain a direct answer to the question and relevant excerpts and sources from the documentation.
Use this mechanism when the answer is not explicitly present in the current page, you need clarification or additional context, or you want to retrieve related documentation sections.