> For the complete documentation index, see [llms.txt](https://docs.glbnxt.com/llms.txt). Markdown versions of documentation pages are available by appending `.md` to page URLs; this page is available as [Markdown](https://docs.glbnxt.com/tutorials/guides/n8n/connecting-n8n-workflows-via-mcp.md).
# Connecting n8n Workflows via MCP to Chat Interfaces
The Model Context Protocol (MCP) provides a standardized protocol for exposing tools, workflows, and dynamic capabilities to LLM frontends. By exposing n8n workflows through an MCP Server trigger node, external AI clients can securely discover, trigger, and consume complex automation flows—such as vector store retrieval, deep research agents, or CRM record ingestions—directly from a conversational interface.
This guide details how to configure an n8n MCP Server setup and subsequently connecting it to two popular open-source AI user interfaces: **LibreChat** and **OpenWebUI**.
***
### Prerequisites
Before starting, ensure you have the following components deployed and accessible:
* **n8n Environment:** An active instance of n8n running within your secure GLBNXT workspace.
* **Target AI Clients**:
* An active **LibreChat** instance with admin access.
* An active **OpenWebUI** instance with administrator access to Admin Settings.
***
### Steps
#### Step 1: Setting up the n8n MCP Server Workflow
The starting point for this integration is a workflow configuration. This workflow acts as the central MCP host, listening for incoming tool calls from MCP clients and executing connected workflow tools.
1. Open your n8n instance and create a new workflow.
2. Add an `MCP Server Trigger` node as your starting point.
3. Select your preferred **Authentication** and **Credentials**, e.g. Header Auth (the rest of this guide uses Header Auth.
4. Choose a path, e.g. `glbnxt-n8n-mcp`.
5. You will need the `Production URL` in later steps.
6. If you already have workflows that you want to connect, take a look at the following steps:
1. Click on the '+' underneath your MCP Server Trigger node (look for `Tools`).
2. Select `Call n8n Workflow Tool`.
3. In the **Workflow** field change "From list" to "By ID".
4. Go to the workflow you want to connect to.
5. Look at the URL in your search bar.
6. The part after /workflow/...... is the ID you want to paste in the **Workflow** field.
#### Step 2: Connecting via MCP to AI User Interfaces (OpenWebUI / LibreChat)
\[text]
**Path A: Connecting via MCP to LibreChat**
1. In your LibreChat application, select the **MCP Settings** icon on your side sidebar.
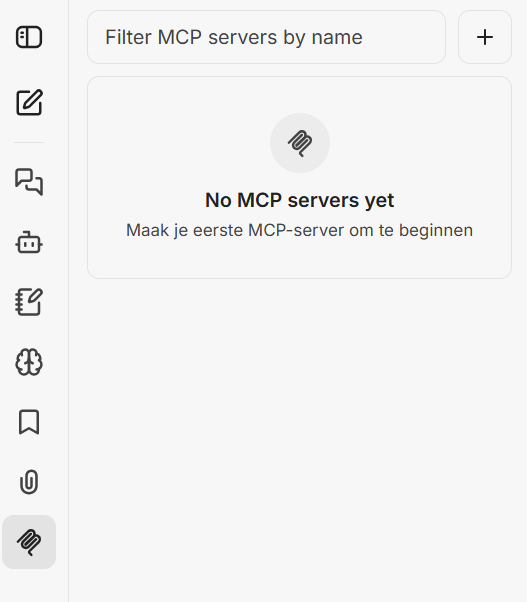 2. Click on the **+** icon, the **Add MCP Server** screen will pop up.
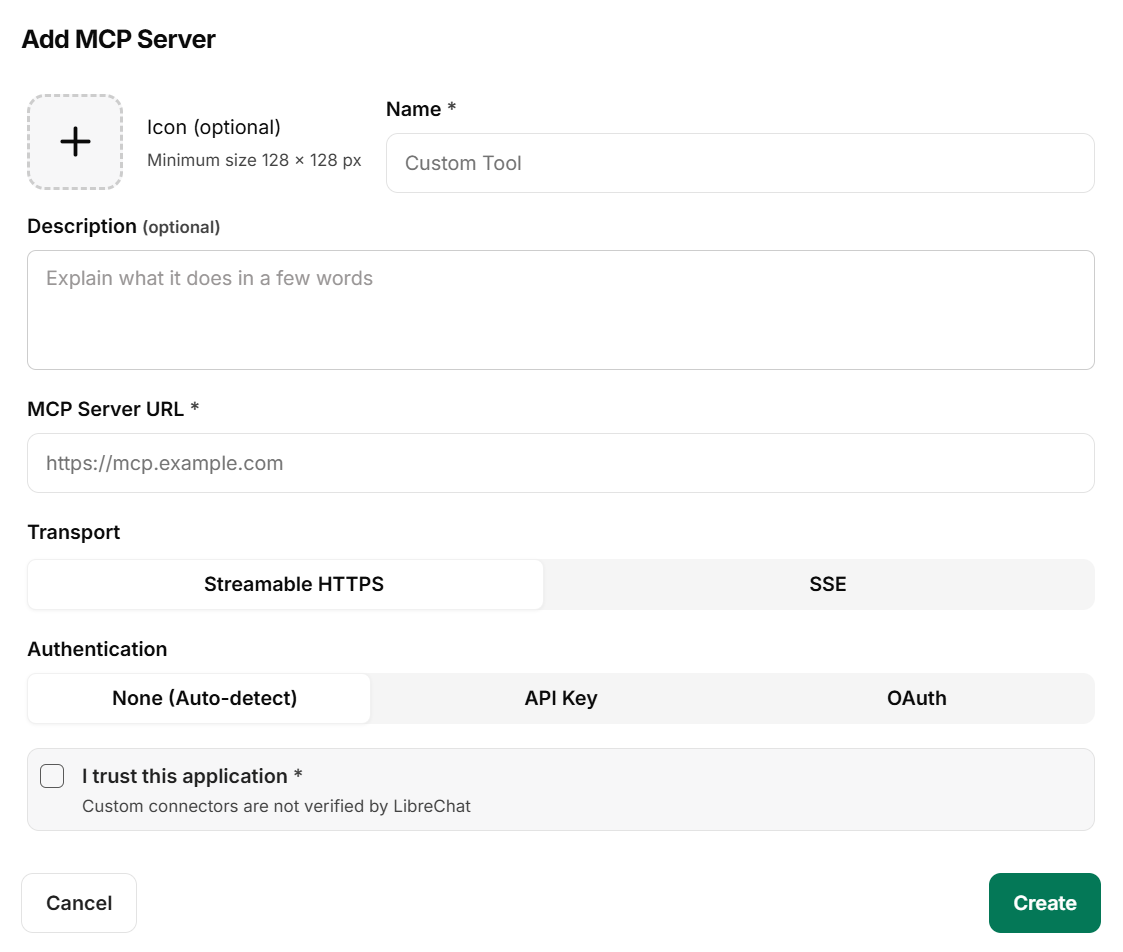 3. Configure your MCP in the pop up screen.
1. Enter your preferred `Name` and `Description`.
2. Paste the `Production URL` from Step 1 in `MCP Server URL`.
3. Set `Transport` to Streamable HTTPS.
4. Set `Authentication` to API Key and choose Custom as Header Format.
5. The Authentication Credential Name you chose in Step 1 is your Custom Header Name.
6. Select `I trust this application` and click `Create`
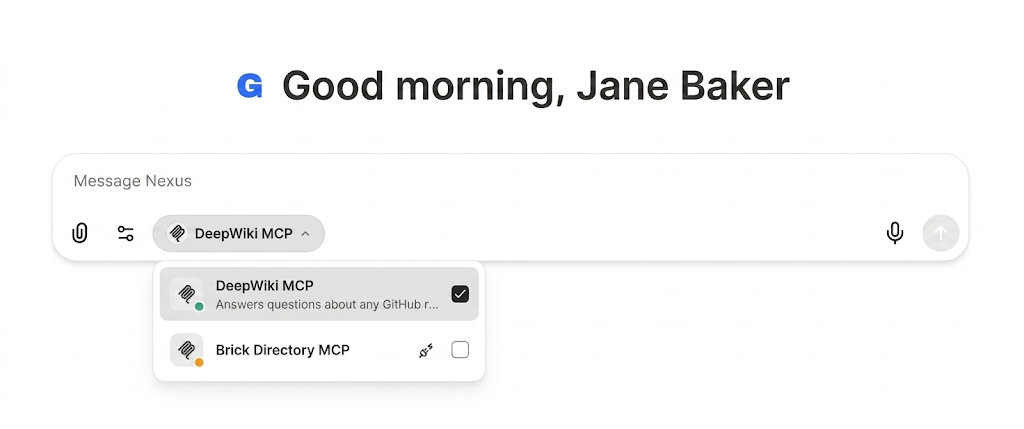
4. Press the **Connect** icon. In the top of your screen, the message `MCP server 'your-name' initialized successfully` will appear.
5. You are now able to connect and disconnect your MCP in the chat environment.
3. Configure your MCP in the pop up screen.
1. Enter your preferred `Name` and `Description`.
2. Paste the `Production URL` from Step 1 in `MCP Server URL`.
3. Set `Transport` to Streamable HTTPS.
4. Set `Authentication` to API Key and choose Custom as Header Format.
5. The Authentication Credential Name you chose in Step 1 is your Custom Header Name.
6. Select `I trust this application` and click `Create`
4. Press the **Connect** icon. In the top of your screen, the message `MCP server 'your-name' initialized successfully` will appear.
5. You are now able to connect and disconnect your MCP in the chat environment.
 **Path B: Connecting via MCP to OpenWebUI**
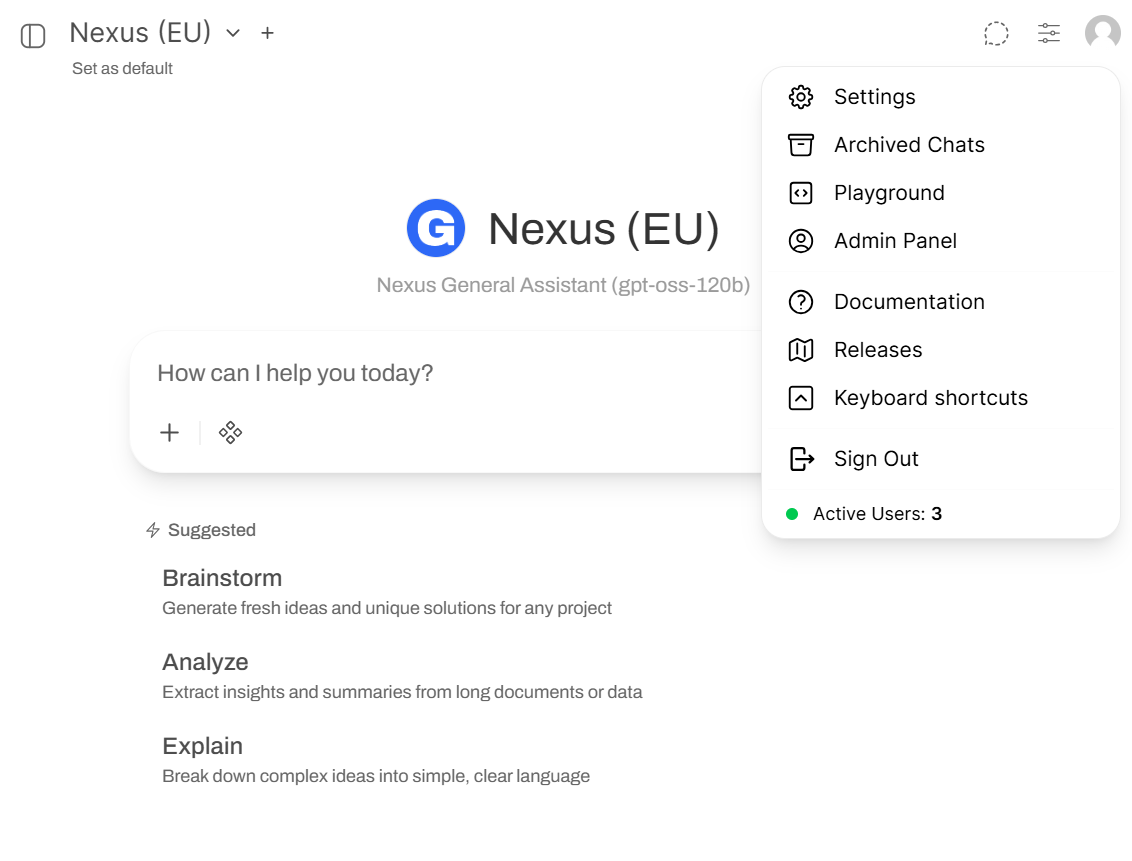
1. In your OpenWebUI application, click on your **User Icon**.
2. Select **Admin Panel** and go to **Settings**.
**Path B: Connecting via MCP to OpenWebUI**
1. In your OpenWebUI application, click on your **User Icon**.
2. Select **Admin Panel** and go to **Settings**.
 3. Go to **Integrations**, here you will find **Manage Tool Servers**.
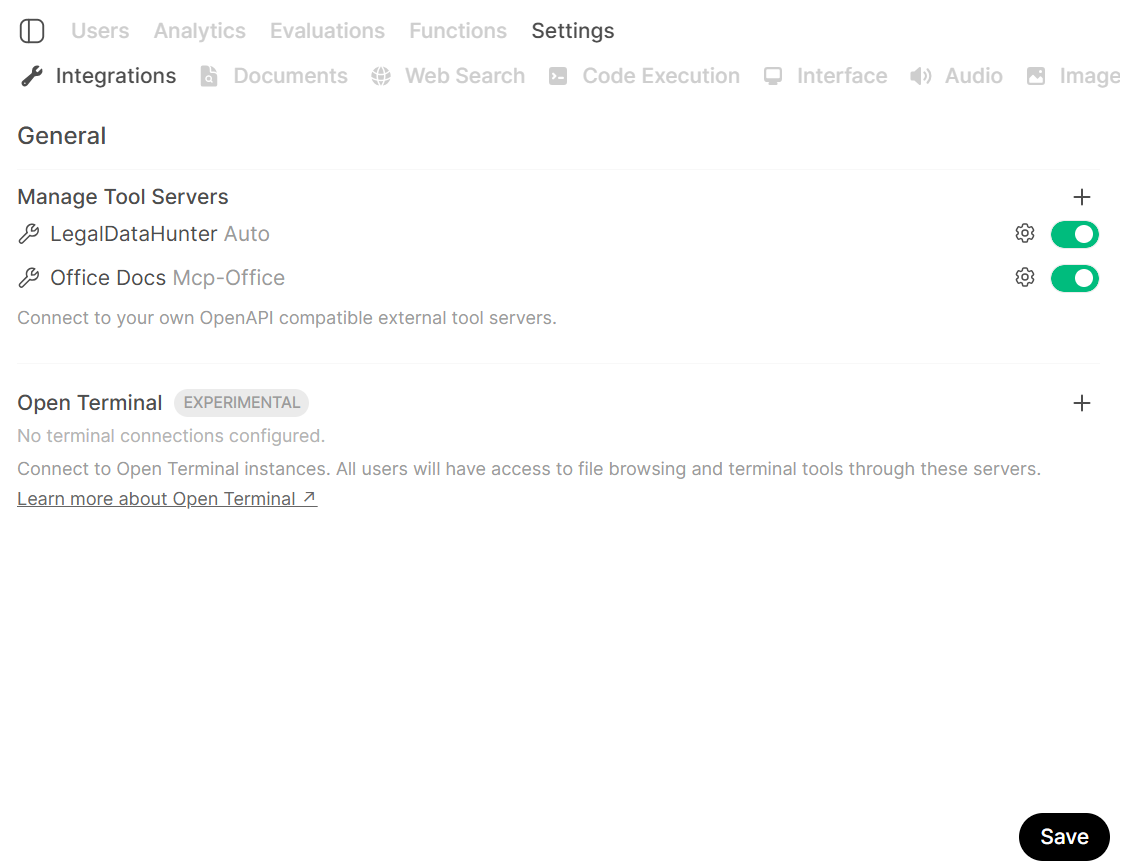 4. Click on the **+** icon, the **Add Connection** screen will pop up.
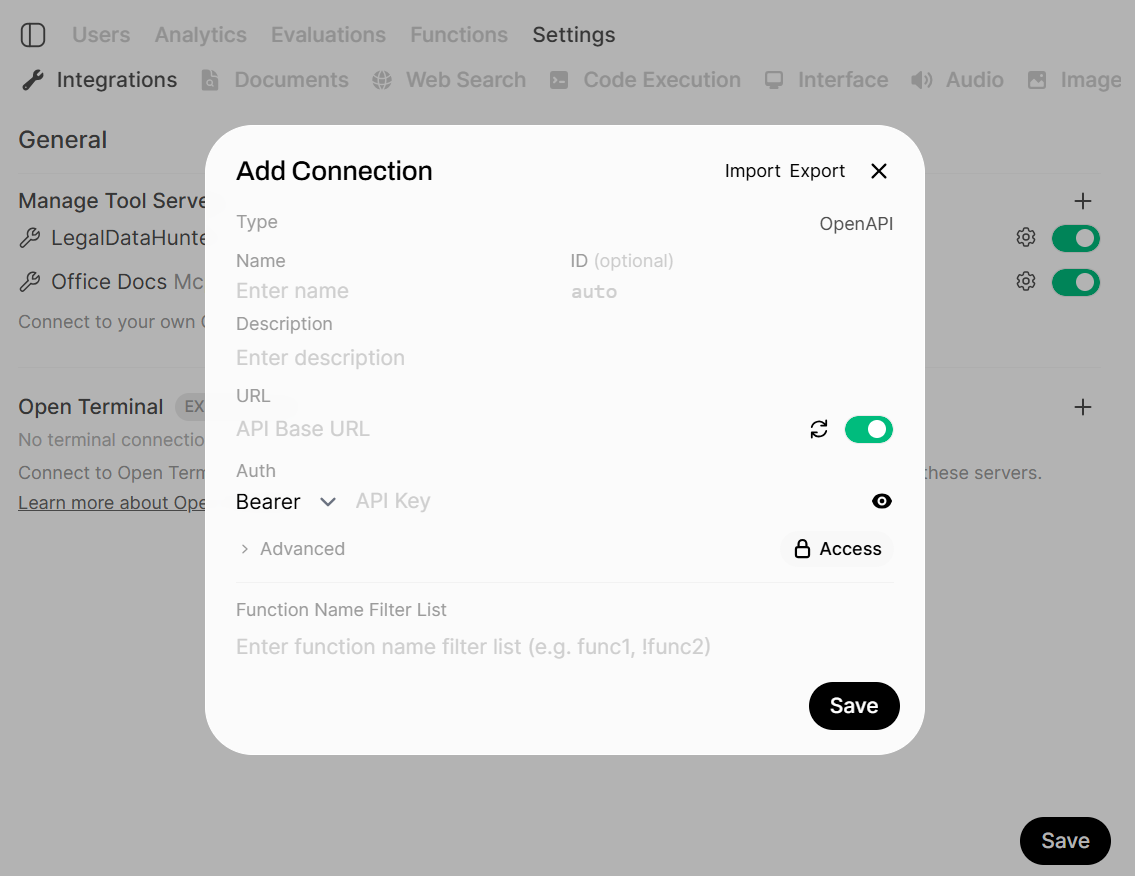 5. Press the **OpenAPI** button at the right upper corner, your screen will look like this.
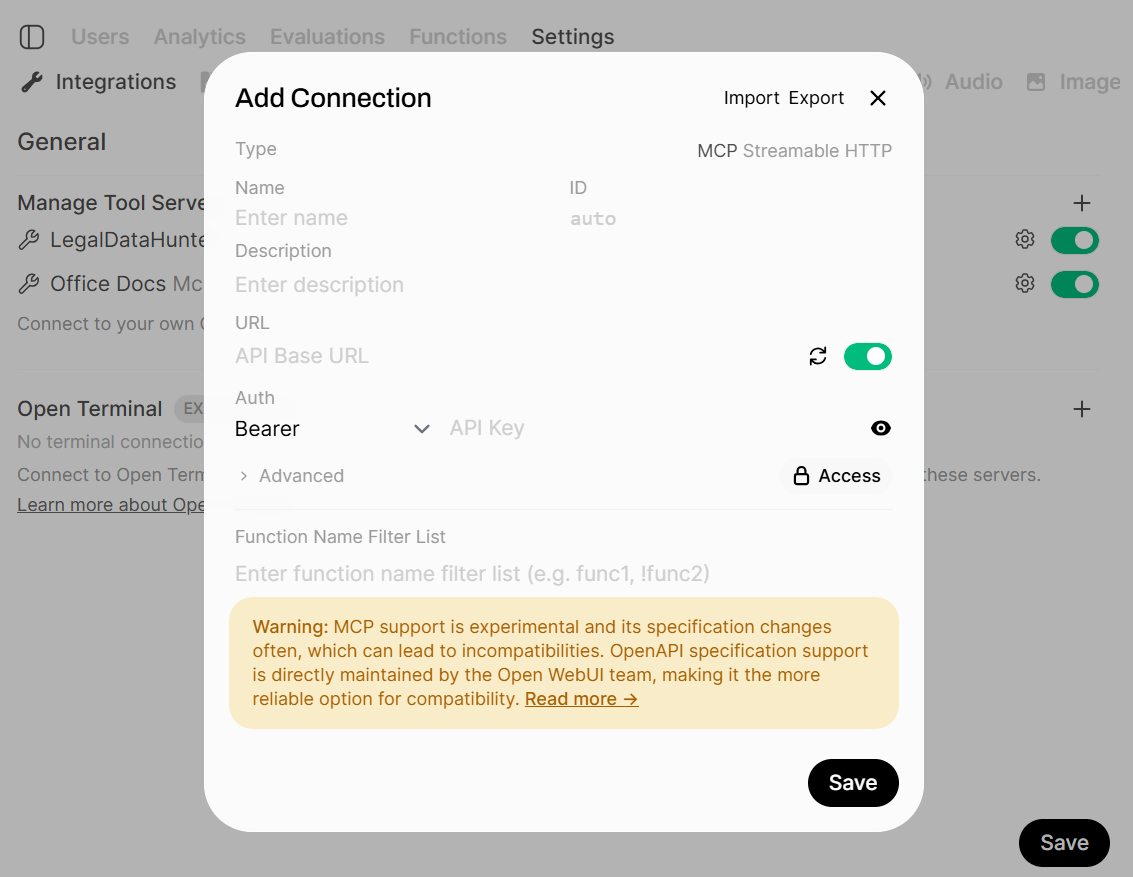 6. Now you are ready to set up your MCP server.
1. Set your `Type` to MCP Streamable HTTP.
2. Enter your preferred `Name`, `Description`, and `ID`.
3. Paste the `Production URL` from Step 1 into `URL`.
4. For `Auth` select None.
5. Then click on Advanced and under `Headers` paste the following json from you **Authorization Credentials** in n8n:
```json
{
"header-auth-name": "your-super-secret-api-key"
}
```
6. Click on the **Verify Connection** button, if your connection is working you will see the message `Connection successful` in the right top corner of your screen.
7. Click on **Save**, in the right top corner the message `Connection saved successfully` will appear.
7. Go to your chat environment and click on **Integrations**.
6. Now you are ready to set up your MCP server.
1. Set your `Type` to MCP Streamable HTTP.
2. Enter your preferred `Name`, `Description`, and `ID`.
3. Paste the `Production URL` from Step 1 into `URL`.
4. For `Auth` select None.
5. Then click on Advanced and under `Headers` paste the following json from you **Authorization Credentials** in n8n:
```json
{
"header-auth-name": "your-super-secret-api-key"
}
```
6. Click on the **Verify Connection** button, if your connection is working you will see the message `Connection successful` in the right top corner of your screen.
7. Click on **Save**, in the right top corner the message `Connection saved successfully` will appear.
7. Go to your chat environment and click on **Integrations**.
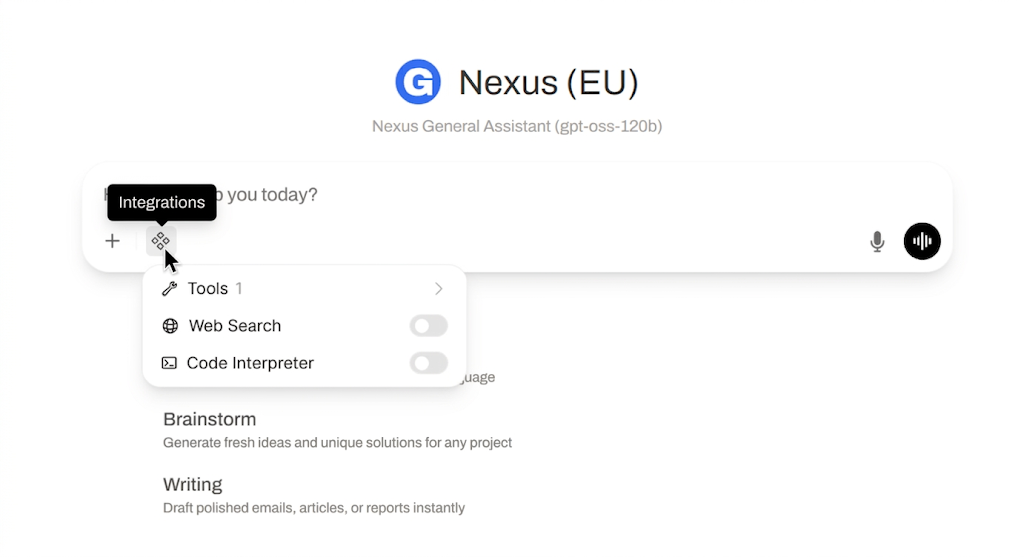 8. Select **Tools** and enable the MCP server.
9. You are now able to use your MCP server in the chat environment.
***
### Troubleshooting & Verification
#### 1. HTTP 401 / 403 Unauthorized Errors
* **Cause**: Mismatch in header authentication credentials between the AI client and n8n.
* **Fix**: Ensure the header key/value pair defined in LibreChat (`librechat.yaml`) or OpenWebUI settings matches the **Header Auth** node connected to the `MCP Server Trigger` in n8n.
#### 2. Workflow Active Status
* **Cause**: n8n returns a `404 Webhook not registered` error.
* **Fix**: Ensure the `🟢 MCP n8n` main workflow is activated in n8n. Test URLs (`/webhook-test/`) only listen while the n8n node editor is actively execution-listening.
#### 3. Tool Description Truncation / Verbatim Passing
* **Cause**: LLM summarizes input instead of passing full verbatim text.
* **Fix**: The tool descriptions inside `MCP n8n.json` explicitly require:
> *"Pass the user's full message verbatim, preserving their original wording and phrasing. Do not summarize, shorten, or convert it into keywords."*
>
> Ensure this directive remains preserved inside the `description` field of every `@n8n/n8n-nodes-langchain.toolWorkflow` node.
***
*Need help? Contact the GLBNXT support team or ask a GLBNXT agent to walk you through the setup.*
---
# Agent Instructions
This documentation is published with GitBook. GitBook is the documentation platform designed so that both humans and AI agents can read, navigate, and reason over technical content effectively. Learn more at gitbook.com.
## Querying This Documentation
If you need additional information that is not directly available in this page, you can query the documentation dynamically by asking a question.
Perform an HTTP GET request on the current page URL with the `ask` query parameter, and the optional `goal` query parameter:
```
GET https://docs.glbnxt.com/tutorials/guides/n8n/connecting-n8n-workflows-via-mcp.md?ask=&goal=
```
`ask` is the immediate question: it should be specific, self-contained, and written in natural language.
`goal` is optional and describes the broader end goal you are ultimately trying to accomplish on behalf of the user. GitBook uses it to tailor the answer towards what is most useful for that goal.
The response will contain a direct answer to the question and relevant excerpts and sources from the documentation.
Use this mechanism when the answer is not explicitly present in the current page, you need clarification or additional context, or you want to retrieve related documentation sections.
8. Select **Tools** and enable the MCP server.
9. You are now able to use your MCP server in the chat environment.
***
### Troubleshooting & Verification
#### 1. HTTP 401 / 403 Unauthorized Errors
* **Cause**: Mismatch in header authentication credentials between the AI client and n8n.
* **Fix**: Ensure the header key/value pair defined in LibreChat (`librechat.yaml`) or OpenWebUI settings matches the **Header Auth** node connected to the `MCP Server Trigger` in n8n.
#### 2. Workflow Active Status
* **Cause**: n8n returns a `404 Webhook not registered` error.
* **Fix**: Ensure the `🟢 MCP n8n` main workflow is activated in n8n. Test URLs (`/webhook-test/`) only listen while the n8n node editor is actively execution-listening.
#### 3. Tool Description Truncation / Verbatim Passing
* **Cause**: LLM summarizes input instead of passing full verbatim text.
* **Fix**: The tool descriptions inside `MCP n8n.json` explicitly require:
> *"Pass the user's full message verbatim, preserving their original wording and phrasing. Do not summarize, shorten, or convert it into keywords."*
>
> Ensure this directive remains preserved inside the `description` field of every `@n8n/n8n-nodes-langchain.toolWorkflow` node.
***
*Need help? Contact the GLBNXT support team or ask a GLBNXT agent to walk you through the setup.*
---
# Agent Instructions
This documentation is published with GitBook. GitBook is the documentation platform designed so that both humans and AI agents can read, navigate, and reason over technical content effectively. Learn more at gitbook.com.
## Querying This Documentation
If you need additional information that is not directly available in this page, you can query the documentation dynamically by asking a question.
Perform an HTTP GET request on the current page URL with the `ask` query parameter, and the optional `goal` query parameter:
```
GET https://docs.glbnxt.com/tutorials/guides/n8n/connecting-n8n-workflows-via-mcp.md?ask=&goal=
```
`ask` is the immediate question: it should be specific, self-contained, and written in natural language.
`goal` is optional and describes the broader end goal you are ultimately trying to accomplish on behalf of the user. GitBook uses it to tailor the answer towards what is most useful for that goal.
The response will contain a direct answer to the question and relevant excerpts and sources from the documentation.
Use this mechanism when the answer is not explicitly present in the current page, you need clarification or additional context, or you want to retrieve related documentation sections.